Talking head videos are the cornerstone of modern content creation, serving as a direct line of communication for marketers, coaches, and business leaders. Yet, a significant gap exists between recording yourself speaking and producing a video that genuinely connects with an audience and drives action. Many creators find their content underperforming, plagued by low watch times and minimal engagement, despite investing time and effort. The problem often isn't the message but the delivery and technical execution, which can inadvertently signal a lack of professionalism or authority.
This guide provides a comprehensive collection of actionable talking head video tips designed to bridge that gap. We will move beyond the obvious advice like "be confident" and instead focus on the specific, tactical adjustments that have a disproportionate impact on your final product. You will learn the precise techniques for setting up professional lighting, mastering camera presence, capturing crystal-clear audio, and strategically framing your shots to hold viewer attention. We will also cover the nuanced art of authentic delivery and the critical role of editing in shaping the pace and impact of your message.
Each tip is crafted to be immediately implementable, providing a clear roadmap to elevate your production quality. For creators and businesses looking to streamline the post-production process, we will also highlight how Tubentum can act as a shortcut to the ideal state, automating tedious editing tasks like removing filler words and refining pacing, allowing you to focus on creating compelling content without getting bogged down by technical complexities. By mastering these principles, you will transform your videos from simple monologues into powerful assets that build trust, establish expertise, and achieve your strategic objectives.
1. Master the Professional Lighting Setup
The foundation of any high-quality talking head video is professional lighting. The industry-standard three-point lighting system, used in everything from TED Talks to corporate training videos, is the single most effective way to elevate your production value. This technique uses a key light, fill light, and back light to create a dimensional, flattering image that instantly signals professionalism and credibility.
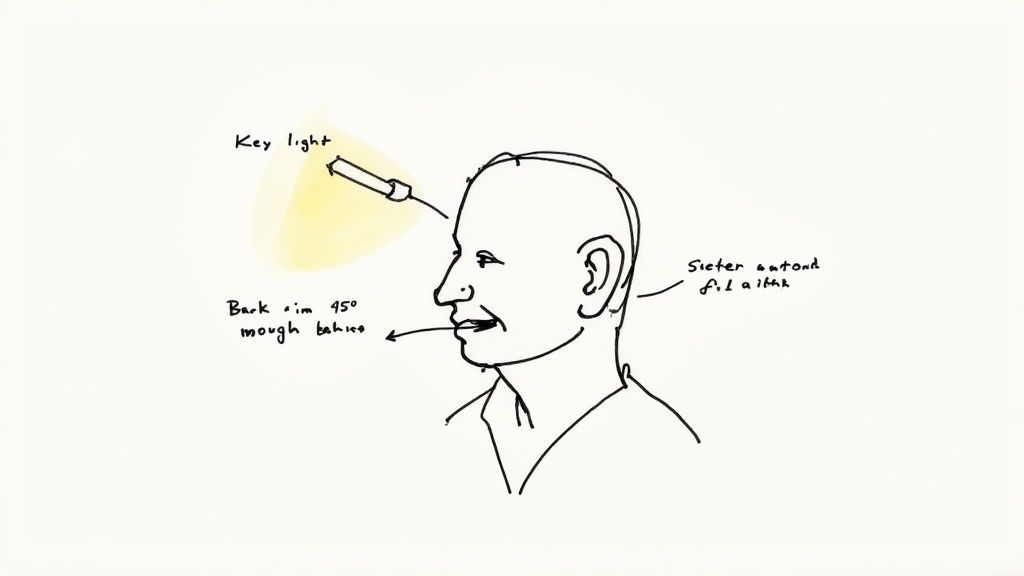
This method eliminates distracting shadows, softens facial features, and separates you from the background, making you "pop" on screen. A well-lit video ensures your message is the focus, free from visual noise that can undermine your authority.
How to Implement Three-Point Lighting
Even on a budget, you can achieve this professional look. The goal is to control the light to shape your appearance, not just to illuminate the space.
- Key Light: This is your primary light source. Position it at a 45-degree angle to your face and slightly above eye level. This placement creates a natural, flattering look with soft shadows.
- Fill Light: Placed on the opposite side of the key light, the fill light "fills in" the shadows created by the key. It should be less intense to maintain dimension; you can achieve this by moving it further away or using a dimmer setting.
- Back Light (or Hair Light): Position this light behind you and above your head. It creates a subtle outline of light around your hair and shoulders, separating you from the background and adding crucial depth to the shot.
Pro Tip: You don't need expensive equipment. Affordable LED softboxes are an excellent investment, as they provide soft, diffused light and don't get hot during long shoots. Even a window can act as a key light, with a simple reflector (like a white foam board) serving as your fill.
Why This Setup is a Top Tip
Poor lighting is one of the fastest ways to lose a viewer's trust. A dark or harshly lit video can feel amateurish and make your content seem less credible. By mastering this foundational technique, you ensure your video looks polished and professional from the very first frame. This is a crucial element among talking head video tips because it directly impacts audience perception and retention.
For more in-depth guidance on optimizing your on-camera appearance, you can find a comprehensive guide on how to look your best on video.
2. Master Eye Contact and Camera Presence
Beyond technical quality, the most powerful tool for building a relationship with your audience is direct eye contact. In a talking head video, the camera lens is the viewer's eye. Mastering how to look directly into it creates a sense of intimacy and connection, transforming a one-way broadcast into a personal conversation that builds trust and holds attention.
This technique is the foundation of engaging on-camera communication, used by everyone from broadcast journalists to top YouTube creators. When viewers feel you are speaking directly to them, they are more likely to listen, engage, and internalize your message. It’s a subtle yet critical skill that separates passive viewing from active engagement.
How to Improve Your On-Camera Eye Contact
Achieving natural, confident eye contact is a skill that can be developed with practice. The goal is to be engaging without appearing stiff or unnatural.
- Look Directly at the Lens: Treat the camera lens as the eyes of a single person you are speaking to. Avoid looking at the flip-out screen to check your appearance; this breaks the connection and makes you appear distracted.
- Position Your Script Correctly: If you use a teleprompter or script, place it as close to the camera lens as possible, ideally directly above or below it. This minimizes eye movement and keeps your gaze focused.
- Blink and Move Naturally: Do not try to force a stare. Blink naturally and allow for subtle head movements and gestures as you would in a real conversation. This adds authenticity to your delivery.
- Practice Short Segments: Record yourself speaking for 30-60 seconds while focusing on the lens. Review the footage to see where your eyes wander and practice maintaining that direct gaze.
Pro Tip: Place a small, bright sticker or a picture of a person next to your camera lens. This gives you a specific, friendly focal point, making it feel more like a genuine conversation and less like you're talking to an inanimate object.
Why This Technique is a Top Tip
Poor eye contact is one of the most common mistakes in talking head videos. Constantly looking away, reading obviously from a script, or checking your monitor instantly signals a lack of confidence and breaks the viewer's immersion. Mastering this skill is one of the most effective talking head video tips because it costs nothing to implement but has a profound impact on audience connection and perceived authority.
A strong on-camera presence, anchored by confident eye contact, ensures your message lands with conviction. Combined with clean editing that removes awkward pauses, like the automated silence removal offered by Tubentum, you can create a seamless and highly professional viewing experience.
3. High-Quality Audio Recording
While video quality is important, audio is the element that truly makes or breaks a talking head video. Viewers are surprisingly forgiving of less-than-perfect visuals, but they will not tolerate poor audio. Crisp, clear, and professional sound builds trust and keeps your audience engaged, whereas distorted or muffled audio immediately signals amateurism and causes viewers to click away.
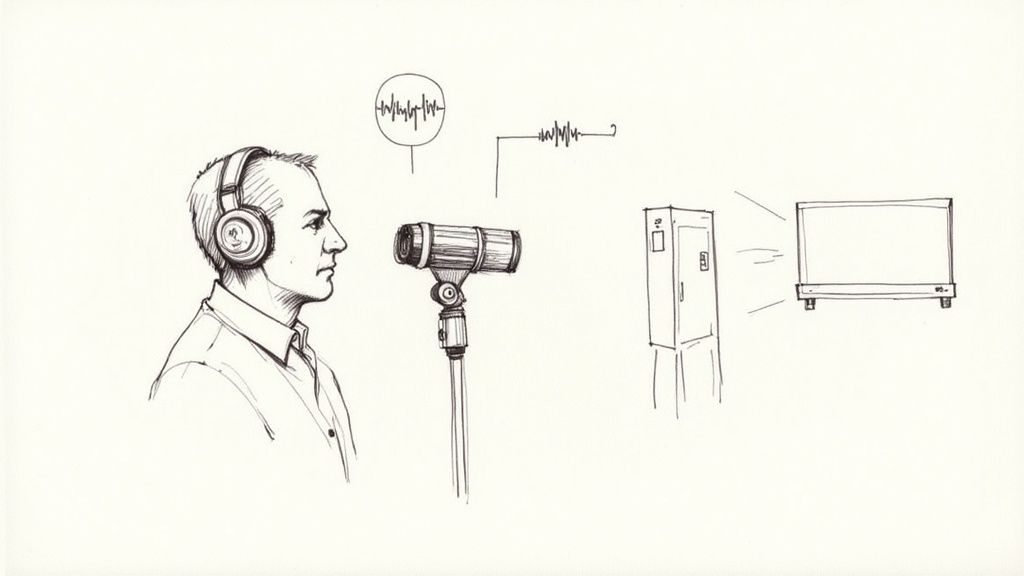
Investing in good audio ensures your message is heard exactly as intended, free from distracting background noise, echoes, or electronic hums. This focus on auditory clarity is a cornerstone of professional content, seen in top-tier podcasts, influential YouTube channels, and corporate webinars where clear communication is non-negotiable.
How to Capture Professional Audio
Achieving high-quality audio is less about having an expensive setup and more about using the right techniques. Your goal is to isolate your voice and eliminate unwanted sounds. For a deeper dive into professional sound, this resource offers a guide on mastering voice-over for clear communication.
- Choose the Right Microphone: A lavalier (lapel) mic is an excellent, discreet choice for talking head videos. Clip it to your shirt, about 6-8 inches below your chin, to capture clear, consistent vocals. Shotgun or condenser mics are also great options if you have a controlled recording space.
- Control Your Environment: Before you hit record, silence your environment. Turn off air conditioners, close windows, put your phone on silent, and ensure there are no other sources of ambient noise.
- Monitor Your Audio: Always wear headphones while recording. This allows you to hear exactly what the microphone is capturing in real-time, so you can adjust levels or identify problems like buzzing or clipping before you've filmed the entire video.
- Record a Backup: If possible, record audio on a separate device, such as an external recorder. This creates a redundant track that can save you if your primary audio source fails.
Pro Tip: Even in a controlled environment, unexpected noises can ruin a perfect take. If you find persistent background hum or hiss in your final recording, specialized tools are essential. You can learn more about how to remove background sound from your videos for a polished, professional finish.
Why This Setup is a Top Tip
Poor audio is one of the most jarring and unforgivable technical flaws in a video. It directly impacts comprehension and a viewer's perception of your expertise. Among all the talking head video tips, prioritizing audio is crucial because it ensures your message is the star of the show. By capturing clean, professional sound, you build credibility and provide a seamless viewing experience that holds audience attention from start to finish.
4. Strategic Background and Framing
Your background isn't just what's behind you; it's a visual extension of your message and personal brand. Strategic framing and a well-curated background work together to build authority, reinforce your topic, and keep viewers focused on you, the speaker. A cluttered or bland backdrop can distract from your content, while an intentional setting, like those used by business influencers and industry experts, adds a layer of professionalism and context.
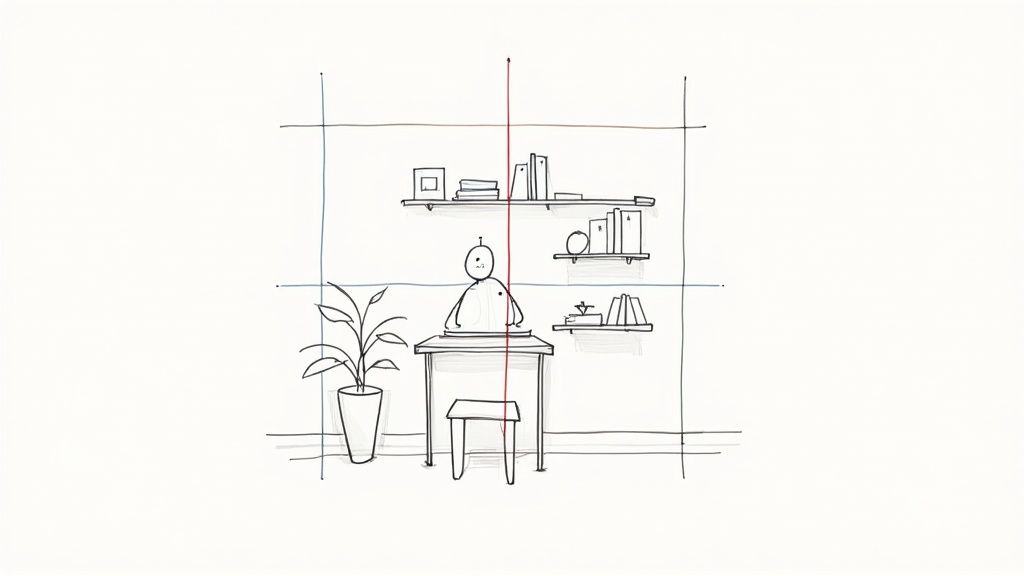
This approach combines classic composition rules with modern branding to create a shot that feels deliberate and high-quality. It tells your audience that you’ve considered every detail, which implicitly boosts your credibility and makes your content more engaging.
How to Implement Strategic Composition
Creating a professional-looking shot involves both how you place yourself in the frame and what you place in the background. The goal is to create visual harmony and depth.
- Apply the Rule of Thirds: Imagine a 3x3 grid over your screen. Position yourself so that your eyes align with the top horizontal line. This is a more dynamic and visually pleasing composition than being dead-center.
- Create Depth of Field: Using a DSLR or mirrorless camera, set your aperture between f/2.8 and f/5.6. This will create a soft, blurry background (bokeh) that makes you stand out as the subject.
- Curate Your Background: Your background should feel authentic but intentional. Place 2-3 relevant items, like books in your niche, a unique lamp, or a plant, to add personality and visual interest without creating clutter. Ensure the colors complement your skin tone and brand palette.
- Master Headroom: Leave a small, appropriate amount of space between the top of your head and the top of the frame. Too much headroom can make you look small, while too little feels cramped and unprofessional.
Pro Tip: While virtual backgrounds are an option, a real, curated background is almost always superior for building trust and authenticity. It shows viewers a genuine piece of your world, which fosters a stronger connection.
Why This Setup is a Top Tip
Among all the talking head video tips, mastering your background and framing offers one of the highest returns on effort. It requires no expensive gear, just thoughtful planning. A well-composed shot subconsciously communicates professionalism and expertise, holding viewer attention longer. Poor framing or a distracting background can immediately signal amateur content, causing viewers to click away before you’ve even delivered your main point. By controlling your visual environment, you control the narrative and ensure your message is received with the authority it deserves.
5. Proper Camera Positioning and Framing
Where you place your camera is as crucial as the quality of the camera itself. Proper camera positioning and framing dictate how your audience perceives you, directly influencing their sense of connection, trust, and your perceived authority. A well-framed shot feels intentional and professional, while a poorly framed one can be distracting and undermine your message.
This technique involves setting your camera at a specific height, angle, and distance to create a flattering and engaging composition. The standard "medium shot," showing you from the mid-chest up, creates a sense of personal conversation, making viewers feel like they are in the room with you. This simple adjustment transforms your video from a casual webcam chat into a professional broadcast.
How to Implement Proper Framing
Achieving a professional-looking frame doesn't require complex equipment, just a few key adjustments. The goal is to create a natural, direct line of sight between you and your audience.
- Set Camera at Eye-Level: Your camera should be positioned directly at your eye level, or very slightly above. This "power position" creates a flattering angle and fosters a feeling of direct, peer-to-peer communication. Looking down at the camera can appear condescending, while looking up can seem submissive.
- Maintain Proper Headroom: Frame the shot so there is a small amount of space between the top of your head and the top of the frame, typically around 10-15% of the total height. Too much headroom makes you look small, while too little feels uncomfortably cropped.
- Use the Right Focal Length: Avoid wide-angle lenses (like those on most webcams) which can distort facial features. A focal length equivalent to 50-85mm on a full-frame camera provides a more natural, flattering perspective that mimics human vision.
- Establish Distance: Position yourself about 3-4 feet from the camera. This distance allows for a comfortable medium shot without the distortion that occurs when you are too close to the lens.
Pro Tip: Stack books under your laptop or use an affordable tripod to easily adjust your camera's height. Before you start recording, do a quick test shot to check your framing and ensure you are centered and composed correctly within the frame.
Why This Setup is a Top Tip
Your camera's position is a form of non-verbal communication. A thoughtfully framed video instantly conveys professionalism and respect for your audience’s time. It ensures your viewers can focus on your message without being distracted by awkward angles or an unbalanced composition. Among talking head video tips, mastering framing is a high-impact, low-effort way to significantly boost your production value and on-screen authority.
6. Embrace Authentic Delivery and Personality
Technical polish is crucial, but it's your authentic personality that truly connects with viewers and builds a loyal audience. An overly polished, robotic delivery can feel distant and untrustworthy. Instead, aim for a conversational and genuine tone that allows your unique character to shine through, making your content more memorable and relatable. This is how business leaders and popular creators build massive followings; they balance professionalism with genuine human connection.
This approach transforms a one-way broadcast into a two-way conversation. When viewers feel like they know and trust the person on screen, they are more likely to engage with the content, subscribe, and return for future videos. Authenticity isn't about being unprofessional; it's about being human, complete with natural expressions, varied vocal tones, and unscripted moments that signal credibility.
How to Cultivate an Authentic On-Screen Persona
Fostering authenticity requires letting go of the need for perfection and embracing a more natural, conversational style. The goal is to speak with your audience, not at them.
- Script with Bullet Points: Avoid writing a word-for-word script, which often leads to a stiff, memorized delivery. Instead, outline your key talking points as bullets. This structure keeps you on track while allowing for spontaneous, natural language.
- Use Natural Body Language: Don't be afraid to use hand gestures and move naturally as you would in a real conversation. Leaning in to emphasize a point or using open, expressive gestures makes you appear more dynamic and engaged.
- Vary Your Vocal Tone and Pace: Monotone delivery is a primary cause of viewer drop-off. Consciously vary your pitch, speed, and volume to match the emotional tone of your content. This vocal variety keeps the viewer's ear engaged and your message compelling.
- Share Personal Stories: Weaving in relevant personal anecdotes or experiences is a powerful way to build rapport. It provides context, demonstrates your expertise in a relatable way, and gives your audience a reason to connect with you on a deeper level.
Pro Tip: Record practice takes where you simply talk through your topic without worrying about mistakes. This helps you find your natural rhythm and speaking style. Often, the most genuine moments come when you're not trying to be perfect.
Why This Delivery is a Top Tip
In a crowded digital landscape, authenticity is a powerful differentiator. Viewers are inundated with content and have become adept at spotting inauthenticity. A genuine delivery builds trust, which is the bedrock of audience loyalty and a key factor in driving conversions for businesses. This is one of the most critical talking head video tips because it directly impacts engagement metrics like watch time and audience retention.
While embracing a natural style, you may notice an increase in filler words like "um" or "uh." Tubentum can automatically detect and remove these hesitations, ensuring your final video is both authentic and polished. To learn more, check out our guide on how to remove filler words from your video.
7. Multi-Camera Setup for Variety
A single, static camera angle can quickly become monotonous, causing viewer fatigue and a drop in retention. Introducing a multi-camera setup is a powerful technique to create dynamic, professional-looking videos that hold audience attention. This approach involves using more than one camera angle to present your content, creating visual interest and adding significant production value.
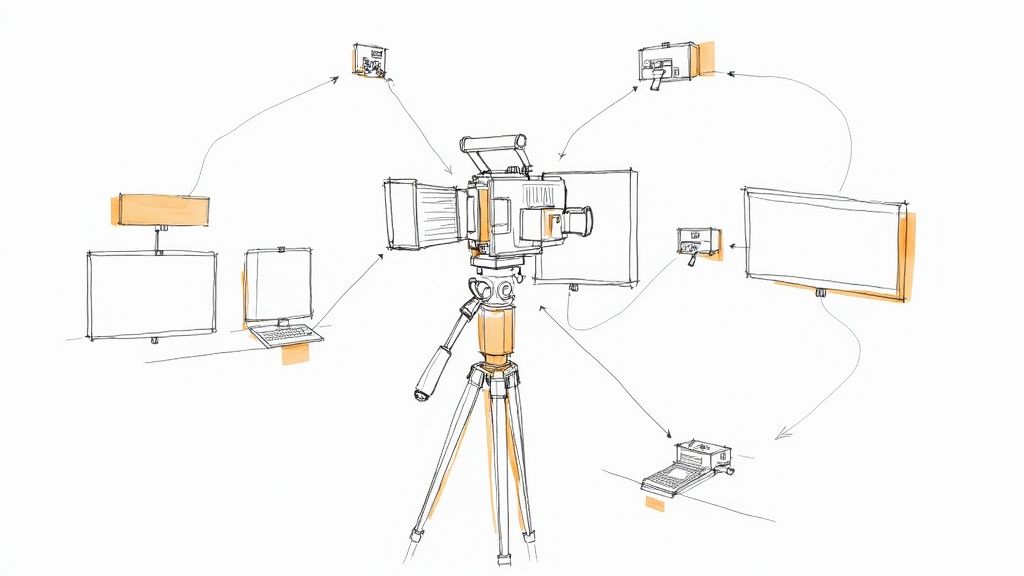
By switching between a primary wide shot and a secondary close-up or side-angle shot, you can emphasize key points, smoothly hide edits or mistakes, and make the viewing experience feel more like a high-quality broadcast. This method breaks the static nature of a standard talking head video, making it far more engaging and professional.
How to Implement a Multi-Camera Setup
Even without two identical cameras, you can achieve this effect. The key is to create distinct, complementary shots that you can cut between in post-production.
- Angle Variation: Position your primary camera (Camera A) straight on at eye level for a standard shot. Place your secondary camera (Camera B) at a 30-45 degree angle to the side, perhaps punching in for a tighter medium or close-up shot.
- Synchronize Your Footage: To make editing seamless, you must sync the video and audio from both cameras. The easiest way is to perform a sharp clap on camera at the beginning of your recording. The visible clap and audio spike will provide a clear synchronization point in your editing timeline.
- Maintain Consistent Audio: Record your audio from a single, high-quality source (like a lavalier or boom mic). Do not rely on the in-camera microphones, as switching between different audio sources will be jarring for the viewer.
- Edit on Transitions: Make your cuts between camera angles at natural points, such as the end of a sentence or during a pause. This makes the switch feel intentional and helps to pace the video effectively.
Pro Tip: Don't have a second camera? You can fake a multi-camera setup with a single 4K camera. Record your main shot in 4K, and in your editing software, you can punch in to create a second, tighter angle in a 1080p timeline without losing quality. This is one of the most efficient talking head video tips for solo creators.
Why This Setup is a Top Tip
A multi-camera setup instantly elevates your video from a simple recording to a polished production. It provides the editor with creative options to make the content more dynamic, fix mistakes, and control the pacing. The visual variety keeps viewers engaged, which is critical for maximizing watch time and audience retention. While the editing can be more complex, services like Tubentum can manage the multi-cam workflow, allowing you to get professional results without the technical overhead.
8. Effective Editing and Pacing
The quality of a talking head video isn't just determined by how it's filmed; it's forged in the edit. Strategic editing and pacing transform raw footage into a dynamic, engaging experience that holds viewer attention. This process involves more than just cutting out mistakes; it’s about surgically removing dead air, filler words, and unnecessary pauses to create a seamless, professional, and highly watchable final product.
Effective pacing ensures your message is delivered with momentum. Business and educational channels use this technique to make complex topics feel fast-paced and digestible. By trimming the fat, you respect the viewer's time and create a video that feels energetic and authoritative.
How to Implement Effective Editing and Pacing
The goal is to create a rhythm that keeps the audience engaged without feeling rushed or jarring. This is where many creators spend the bulk of their post-production time, but the payoff in watch time is enormous.
- Remove Filler Content: The first and most crucial step is to cut out every "um," "uh," "like," and long, thoughtful pause. This single action dramatically increases the video's energy and makes the speaker sound more confident.
- Use Strategic Jump Cuts: A jump cut is a transition between two shots of the same subject taken from slightly different angles or compositions. It's a hallmark of online video that quickly moves the narrative forward and signals a shift in thought.
- Incorporate B-Roll and Visuals: When you are explaining a concept or want to break up the visual monotony of your face, insert B-roll footage, screen recordings, or text overlays. This maintains visual interest and helps reinforce your key points.
- Cut to the Beat: If you use background music, try aligning some of your cuts to the rhythm or beat of the track. This creates a subconscious sense of flow and makes the viewing experience more enjoyable.
Pro Tip: Aim to condense your final video to be 50-70% of the original recording length. This discipline forces you to be ruthless in removing non-essential content. For business creators, manually removing every pause and filler word is time-consuming. Tools like Tubentum automate this process, using AI to detect and remove awkward silences and filler words, delivering a professionally paced edit in minutes.
Why This Setup is a Top Tip
In the fast-paced world of online video, viewer attention is fleeting. Poor pacing, characterized by long pauses and rambling, is a primary reason viewers click away. By mastering editing and pacing, you deliver a tight, compelling narrative that keeps your audience hooked from start to finish. This is one of the most critical talking head video tips because it directly impacts audience retention and the perceived professionalism of your content.
8-Point Talking-Head Tips Comparison
| Item | Implementation complexity 🔄 | Resource requirements ⚡ | Expected outcomes ⭐📊 | Ideal use cases | Key advantages 💡 |
|---|---|---|---|---|---|
| Professional Lighting Setup | Moderate — placement, diffusion, color-temp consistency; initial setup time | Medium–High cost ($300–$2k+); space and power for lights | High-quality, consistent flattering visuals; reduced shadows and depth | Corporate videos, TED-style talks, educational YouTube | Reliable, repeatable professional look; separates subject from background |
| Eye Contact and Camera Presence | Low–Medium — practice and optionally teleprompter setup | Low cost; optional teleprompter or coaching | Strong viewer connection, trust and higher engagement | News-style delivery, vlogs, interviews, live presentations | Builds credibility and immediacy; improves message retention |
| High-Quality Audio Recording | Medium — mic placement, gain, monitoring and acoustic control | Low–Medium cost ($100–$500+); mics, recorder, basic treatment | Significantly improved comprehension and viewer retention | Podcasts, webinars, interviews, educational content | Essential for clarity; reduces background noise and increases professionalism |
| Strategic Background and Framing | Low–Medium — curation, composition, shallow DOF when available | Low (props/staging) to Medium (quality lens/camera for blur) | Professional context that reinforces message and focuses attention | Branded channels, tutorials, corporate communications | Low-cost polish; reinforces credibility and hides clutter with blur |
| Proper Camera Positioning and Framing | Low — tripod/height/angle adjustments and focal-length choice | Low — tripod and standard camera/lens; minimal gear | Flattering perspective that increases perceived credibility and intimacy | LinkedIn videos, Zoom calls, tutorials, headshots | Simple, high-impact improvement to perceived professionalism |
| Authentic Delivery and Personality | Medium — practice, confidence, and controlled vulnerability | Very low — mainly talent time; optional coaching | Higher engagement, loyalty, and memorability | Vlogs, motivational talks, personality-driven channels | Differentiates content; creates strong audience connection |
| Multi-Camera Setup for Variety | High — synchronization, matching angles/lighting, complex editing | High cost ($500–$5k+), extra cameras, more crew/time | Increased production value, better pacing, editing flexibility | Long-form YouTube, webinars, studio podcasts, documentaries | Visual variety, coverage redundancy, dynamic pacing options |
| Effective Editing and Pacing | Medium–High — skillful cuts, timing, and post workflows | Medium — editing software and skilled time investment | Polished final product with improved retention and platform fit | Fast-paced YouTube, branded series, educational videos | Removes filler, emphasizes key points, optimizes viewer flow |
The Shortcut to Professional Videos: Automating Your Editing Workflow
You've just absorbed a comprehensive blueprint for creating compelling talking head videos. From mastering your lighting and audio to cultivating an authentic on-camera presence, each tip is a crucial component in the machine of audience engagement. Implementing these eight pillars will undoubtedly elevate the perceived value and professionalism of your content, transforming standard videos into powerful communication tools. We've covered the strategic importance of your background, the nuances of camera framing, and the dynamic impact of a multi-camera setup.
However, a recurring theme throughout these talking head video tips is the critical role of post-production. The most brilliant on-camera performance can be undermined by poor pacing, distracting filler words, or long, awkward silences. Effective editing is what separates amateur content from polished, professional-grade videos that hold viewer attention from the first second to the last. This final stage is where the magic happens, but it's also where the majority of creators and businesses face their biggest bottleneck: time.
From Manual Labor to Intelligent Automation
For busy professionals, consultants, and marketers, spending countless hours manually trimming silences, hunting down every "um" and "uh," and re-watching footage to tighten the pace is simply not a scalable workflow. This tedious, repetitive labor is the primary barrier preventing consistent, high-quality video output. You can have the perfect lighting, pristine audio, and a charismatic delivery, but if the final edit feels slow and bloated, your message will lose its impact, and your watch time will suffer.
This is where leveraging the right technology creates a significant competitive advantage. The goal is to achieve the ideal state of a perfectly edited video without the punishing time investment. Modern tools are designed to handle this heavy lifting for you. To truly revolutionize your post-production process and significantly boost your creative workflow for talking head videos, consider adopting AI video editing software. These platforms can analyze your footage and automate tasks that once took hours, giving you back your most valuable resource.
The Tubentum Advantage: Your Editing Shortcut
This is precisely the problem Tubentum was built to solve. It provides a direct shortcut to that polished, engaging final product. With a single click, its AI-powered engine automatically analyzes and removes all the "boring" parts from your raw footage.
Think about the most time-consuming aspects of editing your talking head videos:
- Silence Removal: Tubentum intelligently cuts out dead air, creating a dynamic and professional pace that keeps viewers locked in.
- Filler Word Removal: It identifies and eliminates distracting filler words and repeated phrases, resulting in a clean, confident, and authoritative delivery.
- Automated Pacing: The platform tightens up your entire video, ensuring every moment serves a purpose and contributes to viewer retention.
- Intro Hook Placement: It even helps place engaging hooks right at the beginning of your video to maximize engagement from the start.
By automating these crucial but repetitive tasks, you are liberated from the editor's timeline. You can now redirect those saved hours toward what truly moves the needle for your business: crafting your next great script, engaging with your community, or developing new products and services. You've learned the best talking head video tips; now it's time to pair that knowledge with a workflow that respects your time and accelerates your results.
Ready to eliminate tedious editing and publish professional videos in a fraction of the time? Discover how Tubentum can automate your workflow and implement these talking head video tips with unparalleled efficiency. Try Tubentum today and reclaim your time.